Table of Contents
- TCA Peel Preparation: Getting Your Skin Ready
- Step 1: Patch Test and Sensitivity Check
- Step 2: Cleanse and Degrease Your Skin
- Step 3: Apply the TCA Peel Evenly
- How Long to Leave a TCA Peel On
- Step 4: Neutralize and Rinse
- TCA Peel Aftercare: Protecting Your Skin Barrier
- TCA Peel Recovery Day by Day
- Frequently Asked Questions
Last Updated: October 12, 2026
TCA Peel Preparation: Getting Your Skin Ready
A step by step guide to applying a TCA peel safely starts weeks before you open the bottle. Trichloroacetic acid is a real resurfacing acid, and the prep work decides whether you get smooth, even results or a blotchy, irritated mess.
At Makeup Artist’s Choice, we have shipped professional-grade peels since 1997, and the pattern is always the same: rushed prep causes most bad outcomes.
Here is what most guides get wrong. They jump straight to the acid and skip the part where your skin barrier either helps you or fights you.
Stop these two weeks before your peel:
- Retinoids, Retin-A, and prescription tretinoin
- Glycolic acid, salicylic acid, and other exfoliants
- Waxing, threading, and facial scrubs
- Sun exposure and tanning beds
Do these instead:
- Cleanse gently twice a day with a mild cleanser
- Moisturize daily to strengthen the skin barrier
- Wear broad-spectrum sunscreen with SPF 30 or higher every day
The American Academy of Dermatology’s guidance on chemical peel preparation confirms that active ingredients and recent sun exposure raise the risk of irritation and uneven results.
Peeling while you are still using retinoids is one of the most common mistakes we see. It strips the barrier faster than the acid alone, which leads to longer downtime and a higher chance of hyperpigmentation.
Step 1: Patch Test and Sensitivity Check
A patch test is the single step that separates a controlled peel from a gamble. Apply a small amount of diluted TCA to a discreet spot, usually behind the ear or along the jawline, and wait 24 to 48 hours before treating your face.
This is also where candidate screening happens, and it is the step most at-home guides rush. Not everyone should do this at home, and not every TCA product is meant for home use at all.
Know which product you actually have
Before you screen yourself, screen your product. The two categories behave very differently:
- Professional-only strengths. Higher concentrations are intended for trained hands in a clinical setting, where the operator can read frosting, control contact time, and neutralize on a moment’s notice. These are not at-home products, regardless of what a marketplace listing implies.
- Consumer products. Lower concentrations are formulated for at-home use with a defined contact time and, often, a built-in neutralizer. They are designed to be forgiving of minor technique errors.
If your bottle does not clearly state its strength and whether it is intended for professional or at-home use, stop and check with the supplier before you touch your face. Extrapolating clinic instructions onto a consumer product, or the reverse, is how people end up with burns instead of a peel.
You may be a good candidate if you:
- Have uneven tone, sun damage, or mild texture concerns
- Have used acids before without a bad reaction
- Can commit to strict sun protection during recovery
- Have no active breakouts, open lesions, or irritated patches in the treatment area
Defer treatment and talk to a clinician first if you:
- Are pregnant or breastfeeding
- Have active cold sores, cuts, or infections in the treatment area
- Have taken isotretinoin within the past six months
- Have a history of keloid scarring or poor wound healing
That last cluster matters more than most guides admit. Photosensitizing drugs and recent procedures both lower the threshold at which TCA irritates, and stacking them on top of a peel is a common route to a wound rather than a resurfacing.
Skin tone and pigmentary risk
Deeper skin tones carry a higher risk of post-inflammatory hyperpigmentation, and that risk climbs with higher strengths and longer contact times. A lower strength, a shorter contact window, and a professional consult are the safer path. If you are unsure where you fall, ask a dermatologist before you start, this is one decision worth a phone call.
Do not use a patch test as a green light to skip screening. A spot behind the ear can tolerate a peel that your cheeks, jawline, or forehead will not. The patch test checks for allergy and gross intolerance, not for whether your full face is ready.
Step 2: Cleanse and Degrease Your Skin
Clean skin is non-negotiable. Oil, makeup, and leftover moisturizer block the acid from absorbing evenly, which means some areas peel and others do not.
Follow this order:
- Wash your face with a gentle, non-oily cleanser
- Rinse with lukewarm water and pat dry
- Wipe the treatment area with acetone or a degreasing pad
- Let the skin dry completely before you apply anything
Skip the toner, skip the serum, skip the moisturizer. The skin should feel tight and matte. If you are doing a TCA peel safely at home, this is the step people rush, and it shows up later as patchy peeling.
Work in a well-ventilated room and keep a small fan nearby. TCA vapor is mild but noticeable, and good airflow keeps the application comfortable.
Step 3: Apply the TCA Peel Evenly
Even coverage is everything. Uneven application is the fastest route to streaks, hot spots, and a recovery that looks nothing like the photos you saw online.
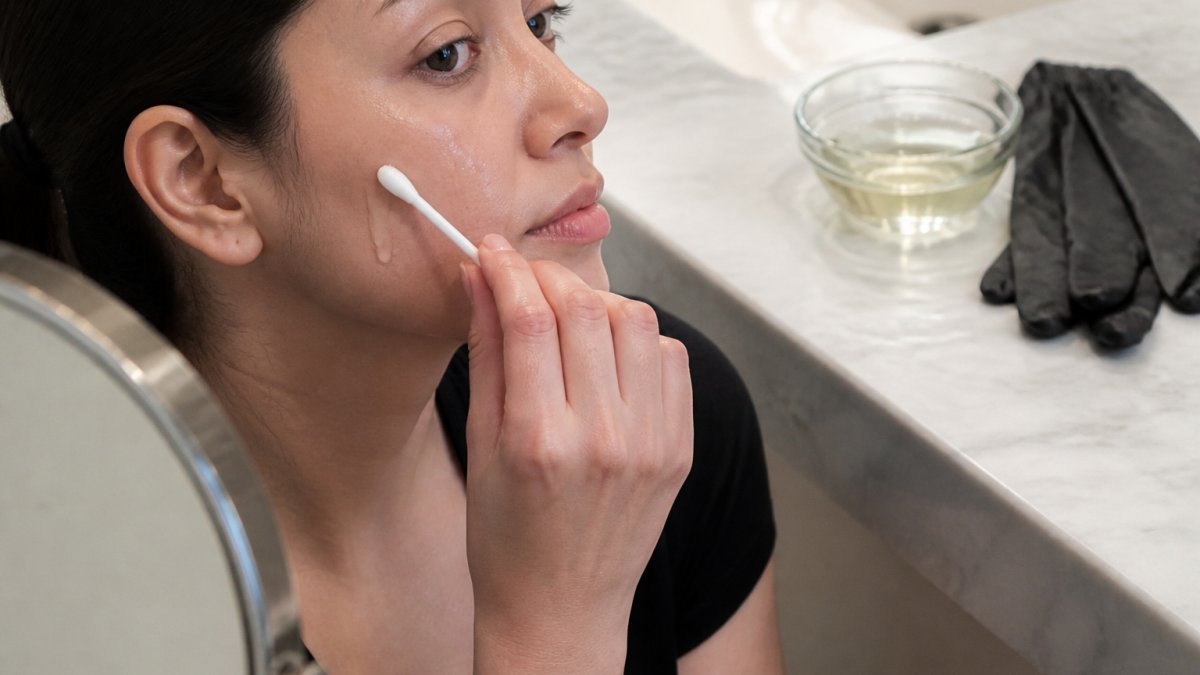
Application tools and technique:
- Use a cotton applicator, gauze pad, or fan brush
- Wear gloves to protect your fingers
- Pour a small amount into a glass or ceramic bowl, never metal
- Start at the forehead, then move to each cheek, then the chin
Application order and coverage:
- Work in small sections, one at a time
- Apply in even strokes, overlapping slightly
- Avoid the eye area, lips, and the corners of your nose
- Do not go back over an area that already dried
Peel strength matters here. Professional-only TCA strengths run higher and belong in trained hands. Consumer products sit at lower concentrations and are designed for at-home use. Know which one you have before you start.
How Long to Leave a TCA Peel On
How long to leave a TCA peel on depends on the strength, the formulation, and your skin’s response, and the honest answer is that there is no single universal timing rule.
The one rule that overrides every other: follow the exact instructions that came with your product or that your clinician gave you. If those instructions conflict with anything you read online, including here, the product or clinician wins.
What contact time actually depends on
- Strength. Lower concentrations are typically left on longer because they work more slowly. Higher concentrations are often neutralized sooner because they act faster and less forgivingly.
- Formulation. Some TCA formulas self-neutralize as they dry; others require a dedicated neutralizer or a thorough water rinse. The formulation, not the clock, decides when the acid stops.
- Your skin’s response. Frosting, even redness, and the intensity of stinging are the real-time signals. They matter more than the minute hand.
Signs to watch during contact time
- A warm stinging sensation that builds over the first minute
- Even redness across the treated area
- Light frosting, a whitish haze, on higher strengths
Stinging is expected. Pain is not. If the sting becomes sharp, burning, or unbearable, neutralize and rinse right away. Do not wait out the clock.
Practical timing guidance
- Start with the shortest recommended time on your first peel
- Never extend the time to “get a better result”
- Never reapply over an area that has already dried
- Keep a neutralizer or cool water within arm’s reach before you start
Leaving a peel on longer than directed does not deepen results evenly. It raises the risk of blistering and infection, and it can push a light peel into a wound that takes weeks to close.
Emergency warning signs, stop and act
These are not normal peeling. If any of the following happen during or right after application, stop the peel and get medical care:
- Severe, escalating pain that does not fade after neutralizing and rinsing
- Blistering that appears during contact time or spreads afterward
- Eye exposure. TCA in the eye is a medical emergency. Flush the eye with cool water for at least 15 minutes and seek immediate care, do not wait to see if it improves.
- Gray, white, or charred-looking skin beyond light frosting
If you are unsure whether something qualifies as an emergency, treat it as one. A call or a clinic visit is cheap compared to a scar.
Timing is product-specific, not universal. Read your instructions, watch your skin, and keep a neutralizer and a phone within reach before you begin.
Step 4: Neutralize and Rinse
Neutralizing stops the acid from working and is the step that ends your contact time. Some TCA formulas self-neutralize as they dry, while others need a dedicated neutralizer or a thorough water rinse.
How to neutralize safely:
- Apply the neutralizer or rinse with cool water immediately
- Keep rinsing until the stinging fades
- Pat the skin dry with a clean towel, do not rub
- Apply a gentle, fragrance-free moisturizer
If your skin still stings after rinsing, rinse again. Residual acid keeps working until it is fully removed.
TCA Peel Aftercare: Protecting Your Skin Barrier
Your skin barrier is wide open after a peel, and aftercare decides how the next two weeks go. Gentle, boring, consistent care wins.
- Moisturize with a thick, fragrance-free cream several times a day
- Use broad-spectrum sunscreen with SPF 30 or higher, every single day
- Avoid direct sun exposure and reapply sunscreen every two hours outdoors
- Skip retinoids, exfoliants, and active serums until healing is complete
- Do not pick or pull at peeling skin
The FDA’s sunscreen guidance is worth reading before you start, because sun protection is the difference between a good result and new dark spots.
Signs you should call a doctor:
- Blistering that spreads or worsens
- Increasing pain, heat, or swelling
- Yellow or green drainage
- Fever
Those are emergency warning signs, not normal peeling. Get medical care rather than waiting it out.
TCA Peel Recovery Day by Day
Recovery follows a predictable arc. Knowing what is normal keeps you from panicking on day three.
| Day | What You’ll See | What To Do |
|---|---|---|
| Day 1 | Redness, tightness, mild stinging | Moisturize, avoid sun, skip actives |
| Days 2-3 | Darkening, early flaking | Keep moisturizing, do not pick |
| Days 4-6 | Visible peeling, fresh pink skin | Sunscreen, gentle cleansing only |
| Days 7-10 | Peeling finishes, tone evens | Resume gentle routine, hold off on acids |
| Weeks 2-4 | Skin settles, results show | Reintroduce actives slowly |
Redness, swelling, and peeling are all expected. Blistering, spreading irritation, or signs of infection are not. If something looks wrong, treat it as wrong.
The recovery timeline is a guide, not a schedule. Healing speed depends on peel strength, your skin type, and how well you protect your barrier during the first week.
Frequently Asked Questions
How long do you leave a TCA peel on?
Contact time depends on the peel strength and your skin’s response, not a fixed clock. Most at-home TCA peels are left on for 1 to 5 minutes before neutralizing or rinsing. Watch for even frosting (a white haze) and stinging. If frosting appears quickly, rinse immediately. Always follow the specific product instructions and start with a lower concentration to gauge your skin’s tolerance.
What should I expect on day 2 of a chemical peel?
Day 2 usually brings increased redness, tightness, and the start of flaking or peeling. Swelling may peak. Keep the skin moisturized with a bland ointment and avoid picking. Sun exposure must be avoided; use broad-spectrum SPF 30+ if you go outside. If you see blistering, severe pain, or signs of infection, contact a medical professional. Normal peeling is expected, but intense pain is not.
How should I prepare my skin before a TCA peel?
Stop all retinoids (including Retin-A), glycolic acid, and other exfoliants at least 3 to 7 days before your peel. Avoid waxing, threading, and laser treatments for at least a week. Keep your skin hydrated and protected with sunscreen. A patch test on a small area 24 to 48 hours before the full application is essential to check for allergic reactions or excessive sensitivity.
When should I contact a medical professional after a chemical peel?
Seek medical attention if you experience severe pain, blistering, open sores, or signs of infection like pus, fever, or increasing redness. Also contact a doctor if you have a history of cold sores, as the peel can trigger an outbreak. If you are unsure whether your reaction is normal, err on the side of caution and call your healthcare provider.
A TCA peel rewards patience and punishes shortcuts, and the difference between a glow and a setback usually comes down to prep and aftercare. Makeup Artist’s Choice has supplied professional-grade at-home peels since 1997, including TCA, glycolic, lactic, and salicylic formulas made in the USA with customizable routines built around your skin. Shop our chemical peel range and get a plan matched to your skin, your goals, and your comfort level.