Last Updated: November 8, 2026
Quick Summary
To cover acne hyperpigmentation with makeup, start with clean, gently exfoliated, moisturized skin, then apply a thin layer of oil-free, non-comedogenic primer. Tap a warm color corrector only on the dark marks, follow with medium-coverage foundation, spot concealer, and set only the T-zone and concealed spots.
- Exfoliate two to three times weekly, not every day, and moisturize while skin is still damp.
- Match your corrector to skin depth and undertone, and tap it on in thin layers instead of rubbing.
- Medium foundation plus spot concealing gives the most natural-looking finish for everyday wear.
- Press a finely milled powder only on the T-zone and concealed spots, then finish with setting spray.
- Daily sunscreen is essential because sun exposure darkens existing marks and slows fading.
Table of Contents
- Prepping Acne-Prone Skin Before Makeup
- The Best Color Corrector for Hyperpigmentation by Skin Tone
- Choosing Foundation Shade and Coverage Level
- How to Cover Acne Scars With Minimal Makeup
- Makeup for Oily Acne-Prone Skin That Lasts
- How to Make Acne Hyperpigmentation Go Away Long-Term
- Troubleshooting Cakey, Flaky, or Faded Coverage
- Build Your Coverage Routine With Professional-Grade Skincare
- Frequently Asked Questions
Prepping Acne-Prone Skin Before Makeup
Most makeup fails on acne-prone skin before the first brushstroke. The culprit is skin prep, not the product.
Acne-prone skin is often easier to work with when it is clean, gently exfoliated, and moisturized. Skin that is clean, gently exfoliated, and moisturized holds makeup far better than skin that is rushed. If you want to know how to cover acne hyperpigmentation with makeup convincingly, start here.
Cleanse, Exfoliate Gently, and Moisturize
Use a gentle cleanser first. Skip harsh scrubs and anything that stings. Over-exfoliating makes redness worse and lifts flakes that makeup then clings to.
Follow with a light chemical exfoliant a few times a week, not daily. A mild glycolic or salicylic formula smooths texture over time.
- Cleanse with lukewarm water, never hot
- Exfoliate two to three times weekly, not every day
- Apply moisturizer to damp skin to lock in hydration
Skipping moisturizer is a common mistake. Dry skin grabs foundation unevenly and makes dark marks look more textured than they are.
Primer Choices for Oily and Textured Skin
Primer is where oily, textured skin either holds or falls apart. A mattifying, pore-blurring primer smooths the surface and controls shine through the day.
For acne-prone skin, choose oil-free and non-comedogenic formulas (the American Academy of Dermatology). Silicone-based primers fill in texture and give foundation something to grip.
Watch out: too much primer pills under foundation and makes coverage patchy. A pea-sized amount covers the whole face.
The Best Color Corrector for Hyperpigmentation by Skin Tone
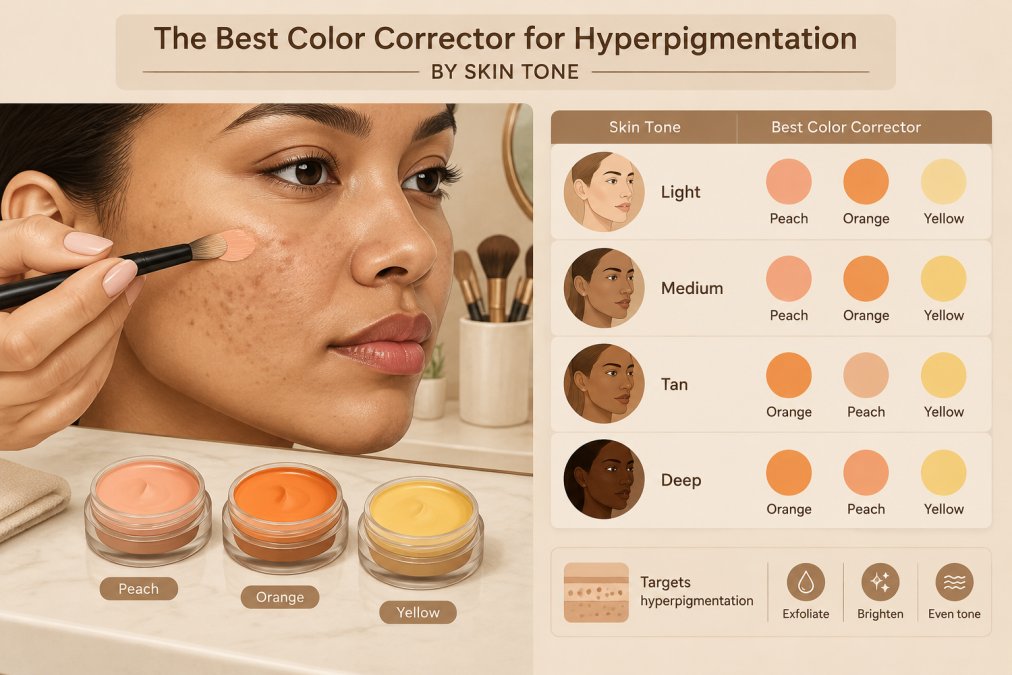
The best color corrector for hyperpigmentation depends on your skin tone and the mark’s undertone. Correctors cancel color before foundation goes on. Get this step right and you need far less concealer.
Why Brown Marks Need a Warm Corrector
Color correction works on the color wheel. Brown and dark marks lean blue or purple, so warm correctors neutralize them. The goal is not to paint over the mark but to cancel its cool cast so foundation can match the surrounding skin.
A corrector that sits one to two shades warmer than the skin and roughly one shade lighter in depth is a common starting point. Too light and the mark turns gray under foundation. Too dark and it looks muddy.
A Skin-Tone-Specific Corrector Guide
Instead of memorizing one color, match the corrector to your skin depth and undertone. The table below is a starting point, not a rule; test on the jawline in natural light.
| Skin tone | Best corrector | Why it works | Watch for |
|---|---|---|---|
| Fair to light, cool or neutral undertone | Peach or light salmon | Cancels blue-purple without adding warmth to the face | A peach that is too orange looks like a stain |
| Fair to light, warm undertone | Light peach with a hint of yellow | Neutralizes without clashing with golden skin | Yellow alone can leave a gray cast on pink marks |
| Medium, neutral or olive undertone | Orange or apricot | Cuts through deeper brown and purple marks | Olive skin can turn an orange corrector ashy; blend edges well |
| Medium to tan, warm undertone | Warm orange or red-orange | Matches the depth of deeper discoloration | Red-orange can look inflamed on active redness nearby |
| Deep, neutral undertone | Deep orange or red-orange | Cancels dark brown and purple marks at the right depth | A corrector too light leaves a gray halo |
| Deep, warm undertone | Red or brick red | Neutralizes very dark, cool-toned marks | Use the smallest amount; red is easy to overdo |
| Deep, cool undertone | Deep orange with a red base | Balances blue-purple without turning ashy | Test under foundation, not on bare skin alone |
For sallow or dull areas that are not brown marks, a pink or lavender corrector can help, but those shades do not cancel hyperpigmentation. Keep them separate from your spot-correction routine.
How to Apply Corrector Without a Gray Cast
Apply a tiny amount with a small brush and tap, don’t rub. Build in thin layers. Let each layer set for a few seconds before adding the next. If you see gray, the corrector is too light or too cool for the mark; step one shade warmer or deeper.
Watch out: applying corrector across the whole face instead of only on the marks wastes product and can make the complexion look uneven. Keep correction targeted to the discoloration.
Choosing Foundation Shade and Coverage Level
Foundation shade should match your neck, not the mark you’re hiding. Test along the jawline in natural light before buying.
Coverage level is a trade-off. Full coverage hides more, but heavy layers look cakey on textured skin. Medium coverage with targeted concealing often looks more natural.
- Sheer: evens tone, lets marks show
- Medium: good balance for most acne-prone skin
- Full: best for events or very dark marks, use sparingly
For everyday wear, medium foundation plus spot concealing gives the most natural-looking finish. Build coverage only where you need it.
How to Cover Acne Scars With Minimal Makeup
Learning how to cover acne scars with minimal makeup comes down to targeted application and the right order. You are not painting the whole face. You are treating specific spots, and the sequence you use determines whether coverage sits flat or breaks apart.
The trick is to distinguish discoloration from texture. Flat brown marks cover well with corrector and concealer. Raised or pitted scars catch light differently, and heavy product makes them look worse, not better.
A Repeatable Layering Sequence
Use this order every time. It is designed to keep product thin where texture is present and concentrated where discoloration is darkest.
- Skincare: cleanse, moisturize, and let products absorb for about five minutes. Hydrated skin holds makeup; dry skin grabs it unevenly.
- Sunscreen: apply a broad-spectrum sunscreen and let it set. Sun protection also prevents existing marks from darkening.
- Primer: use a thin layer of oil-free, non-comedogenic primer on the T-zone and any textured areas. Let it set for a minute.
- Corrector: tap a small amount only on the dark marks, using the shade guide above.
- Foundation: apply a thin, even layer over the face. Medium coverage is usually enough when correction is done first.
- Concealer: dot concealer only on visible marks and blend the edges with a fingertip or small brush.
- Setting: press a finely milled powder only on the T-zone and concealed spots, then finish with a setting spray.
For raised or flaky lesions, use less product at every step. A thin layer of concealer blended at the edges hides discoloration without highlighting texture. A hydrating primer underneath helps flaky makeup sit flat.
Troubleshooting Pilling, Patchiness, and Transfer
Even with the right order, things can go wrong. Here is how to diagnose the most common problems.
- Pilling (product rolls into little balls): usually caused by too much primer or by layering silicone primer over water-based skincare that has not absorbed. Wait longer between steps and use less primer.
- Patchiness over texture: heavy product on raised scars emphasizes bumps. Use less foundation and concealer, and blend only the edges of the mark.
- Flaking on marks: dry or irritated skin underneath. Moisturize, use a hydrating primer, and avoid powder directly on the flakes.
Watch out: adding more foundation to fix patchiness usually makes it worse. Remove a layer or spot-correct instead of building up product across the whole face.
Makeup for Oily Acne-Prone Skin That Lasts
Makeup for oily acne-prone skin needs to survive shine and transfer. The order of your products matters as much as the products themselves.
A common mistake is setting everything with heavy powder. That backfires on oily skin, because powder mixes with oil and turns patchy by midday. Light, targeted setting works better.
Setting Powder and Transfer-Resistant Finishing
Set only the areas that get oily: the T-zone, and any concealed spots. Press powder in with a small puff rather than sweeping it on.
- Use a finely milled setting powder, not a heavy one
- Press, don’t dust, to lock coverage in place
- Finish with a setting spray for long-wear makeup
Transfer-resistant techniques help coverage stay put. A setting spray bonds the layers and reduces transfer onto masks, phones, and clothing. Reapply concealer only where it has faded, not across the whole face.
How to Make Acne Hyperpigmentation Go Away Long-Term
Makeup covers acne hyperpigmentation for the day. It does not fade the marks, and that is the part most guides skip.
Post-inflammatory hyperpigmentation fades slowly on its own, often over months. The American Academy of Dermatology guidance on dark spots explains how UV exposure worsens discoloration.
Chemical exfoliants are often used to encourage cell turnover over time. If at-home remedies interest you, our guide on natural remedies for dark acne spots covers what actually fades marks. For daily protection, read whether a daily sunscreen routine is safe for acne-prone skin. And for a deeper look at evening out tone, see our guide on why to use glycolic acid for uneven skin tone.
Consistency matters more than strength. Gentle, regular use beats aggressive treatments that irritate skin.
Troubleshooting Cakey, Flaky, or Faded Coverage
Cakey, flaky coverage usually traces back to too much product or dry skin underneath. Faded coverage points to a missing setting step. Here is how to diagnose and fix each problem.
| Problem | Likely Cause | Fix |
|---|---|---|
| Cakey texture | Too much primer or foundation | Use thinner layers, build slowly |
| Flaking on marks | Dry or irritated skin | Moisturize, use hydrating primer |
| Faded by midday | No setting step | Press powder, add setting spray |
| Gray cast on marks | Wrong corrector shade | Match corrector to skin depth |
| Patchy over texture | Heavy product on raised scars | Use less, blend edges only |
A few fixes solve most issues. If coverage looks heavy, remove a layer rather than adding powder on top. If marks show through, add a touch of corrector before more foundation, not after.
Build Your Coverage Routine With Professional-Grade Skincare
Covering acne hyperpigmentation well is a skill built on two habits: a smooth base and the right product order. Neither happens overnight.
The challenge is that makeup only manages the marks. You can browse moisturizers for acne-prone oily skin to prep your base, or explore color cosmetics for primer and coverage.
If dark marks keep returning, the fix is a routine that treats them, not just conceals them.
Frequently Asked Questions
Should I use color corrector or concealer on acne dark spots?
Use both, in that order. A color corrector neutralizes the brown or purple undertone in acne hyperpigmentation, while concealer matches your surrounding skin and adds coverage. Apply a thin layer of peach or orange corrector only on the dark spot, tap it out, then follow with concealer. Skipping the corrector forces you to pile on concealer, which looks cakey over textured marks.
How do I keep makeup from looking cakey over acne marks?
Build in thin layers and press, don’t swipe. Start with a smoothing primer on textured areas, apply corrector with a small brush only on the mark, then stipple concealer with a damp sponge. Set with a light dusting of finely milled powder rather than a heavy layer. For raised or flaky lesions, avoid full-coverage foundation directly on top and use spot concealing instead, which keeps the surrounding skin looking natural.
Can makeup cover acne scars and dark spots naturally?
Yes, with the right order: color correct, spot conceal, then a light foundation or skin tint over the top. Makeup hides the color of hyperpigmentation well, but it cannot flatten raised scars or fill indented ones, so texture will still show in certain lighting. A natural-looking finish comes from matching concealer to your surrounding skin tone and blending edges with a buffing brush.
How can I make acne hyperpigmentation go away faster?
Makeup covers it, but fading takes consistent skincare. Daily broad-spectrum SPF prevents dark spots from darkening, and exfoliating acids such as glycolic, lactic, or mandelic acid help speed up cell turnover over weeks to months. Stop picking at blemishes, since that is what drives new post-inflammatory hyperpigmentation.